
Connecting security cameras to a business network is the process of linking IP-based surveillance devices to your existing IT infrastructure so footage can be recorded, stored, and accessed from a central point. Done correctly, this setup protects your physical premises and your corporate data at the same time. Done poorly, it opens a backdoor into your entire network. This guide covers the hardware you need, how to configure your network with proper segmentation, and the step-by-step process to get cameras online securely. Whether you are running a retail shop in Pittsburgh or managing a multi-site office, these practices apply directly to your situation.
What hardware do you need to connect security cameras to a business network?
The foundation of any business surveillance camera setup is the right hardware. Choosing the wrong equipment at this stage creates problems that no amount of configuration can fix later.
IP cameras vs. analog cameras is the first decision you face. IP cameras transmit digital video over a standard Ethernet network, which means they integrate directly with your existing IT infrastructure. Analog cameras require a separate coaxial cable run and a Digital Video Recorder, adding cost and complexity. For any business building or upgrading a network today, IP cameras are the correct choice.

Power over Ethernet (PoE) switches are the backbone of a clean IP camera installation. PoE delivers both power and data through a single Ethernet cable to each camera. That eliminates the need for separate power outlets at every camera location, which matters when you are mounting cameras on ceilings or exterior walls. A 4-port or 8-port PoE switch costs between $50 and $150 for typical small business deployments. That price point makes PoE the most cost-effective power solution available.
Network Video Recorders (NVRs) store and manage footage from IP cameras. Unlike older DVR systems, an NVR connects directly to your network switch and communicates with cameras over IP. You can choose a standalone NVR appliance or a software-based NVR running on a dedicated server. For most small businesses, a standalone appliance is simpler to manage and maintain.
Here is a summary of typical hardware requirements and price ranges for a small business camera system:
| Hardware | Purpose | Approximate Cost |
|---|---|---|
| IP cameras (per unit) | Capture and transmit video | $80 – $250 each |
| PoE switch (4–8 port) | Power and connect cameras | $50 – $150 |
| Network Video Recorder | Store and manage footage | $200 – $600 |
| Cat6 Ethernet cable (per run) | Connect cameras to switch | $0.20 – $0.50 per foot |
| Business router/firewall | Network control and VLAN support | $150 – $500 |
Professional installation for a complete system ranges from $1,500 for a 4-camera setup to over $3,000 for larger deployments. That cost reflects labor, cabling, configuration, and testing. You can reference the 2026 tech budget guide from Ventis Consulting Group for a broader view of how surveillance fits into your overall IT spending.
Pro Tip: Buy a PoE switch with at least 30% more power capacity than your cameras currently require. Adding cameras later without headroom is the fastest way to cause system instability.
How should you configure your network to integrate security cameras securely?
Network configuration is where most small business owners make critical mistakes. Plugging cameras directly into your main business network puts every device on the same segment, which means a compromised camera can reach your file servers, point-of-sale terminals, and employee workstations.
The correct approach is a dedicated VLAN (Virtual Local Area Network) for your cameras. VLAN isolation is required for businesses deploying 10 or more cameras to protect the corporate network from potential breaches. Even if you have fewer cameras, the practice is worth following. A VLAN creates a logically separate network segment on the same physical switch infrastructure.
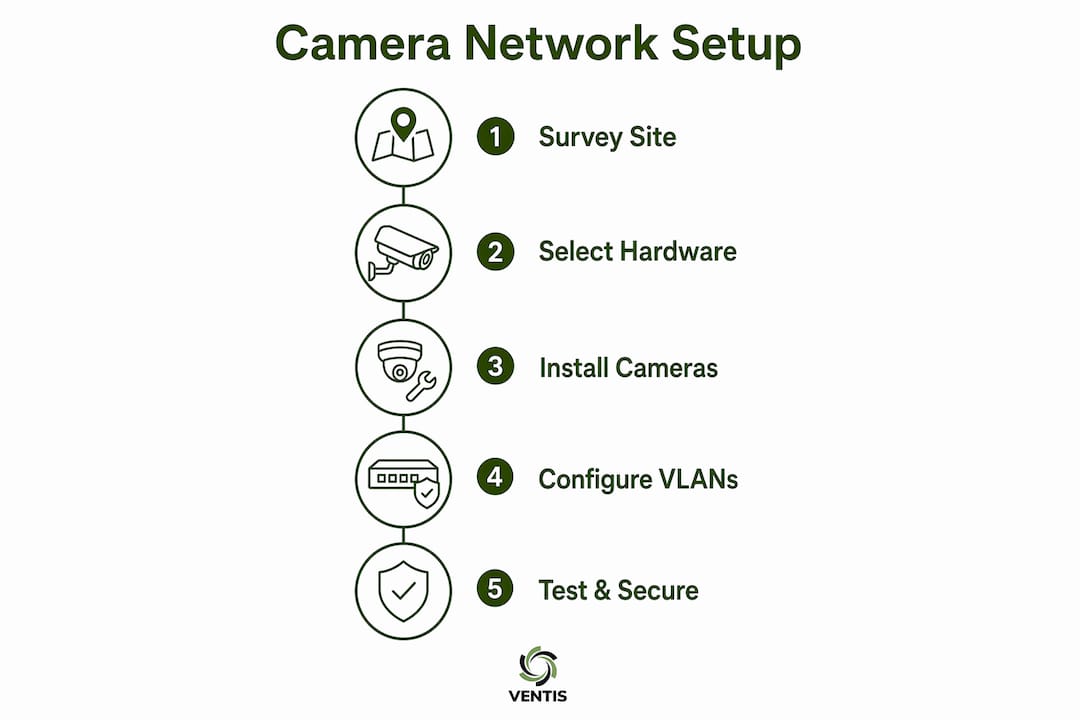
Here is a step-by-step approach to configuring your camera VLAN:
- Create a dedicated VLAN on your managed switch. Assign it a unique VLAN ID, such as VLAN 20, and a separate IP subnet, such as 192.168.20.0/24. Keep this range completely separate from your main business network.
- Assign camera switch ports to the camera VLAN. Every port connected to a camera or NVR should be tagged to VLAN 20 only. No camera port should have access to your main business VLAN.
- Place the NVR on the same VLAN as the cameras. The NVR and cameras must share a VLAN for direct communication. Management access to the NVR from the business network is then controlled through firewall rules, not open routing.
- Set firewall rules to block outbound camera traffic. Proper VLAN configuration blocks cameras from initiating outbound connections to the business network or the public internet. This prevents a compromised camera from acting as a backdoor. Cameras should only respond to requests, never initiate them.
- Allow only specific inter-VLAN traffic. Permit traffic from authorized management workstations on the business network to reach the NVR on the camera VLAN. Block everything else between the two segments.
Beyond VLAN setup, two additional practices protect your system over time. First, change the default username and password on every camera and NVR before connecting them to the network. Default credentials are publicly documented and are the first thing an attacker tries. Second, keep camera firmware updated. Manufacturers release patches for known vulnerabilities, and an unpatched camera is a known risk.
Security camera cybersecurity for SMBs is a topic worth reading before you finalize your configuration. The vulnerabilities are real and well-documented.
Pro Tip: Label every network drop and switch port with the camera ID and location during installation. Troubleshooting a 12-camera system with unlabeled ports wastes hours.
Step-by-step process to physically connect and configure your cameras
With hardware in hand and your network configured, the physical installation follows a clear sequence. Skipping steps here creates problems that are frustrating to diagnose later.
- Run Cat6 Ethernet cable from each camera location to your PoE switch. Keep runs under 328 feet (100 meters) to stay within the IEEE 802.3 standard for PoE. Longer runs cause power and signal degradation.
- Mount cameras and connect Ethernet cables. Plug each camera into a designated PoE switch port assigned to your camera VLAN. The camera will power on automatically.
- Assign static IP addresses or DHCP reservations to each camera. Static IPs prevent address conflicts and make it easier to identify cameras by IP. If you use DHCP, create a reservation tied to each camera's MAC address so the address never changes.
- Connect the NVR to the PoE switch on the camera VLAN. Open the NVR interface and run a camera discovery scan. The NVR will detect cameras on the same subnet automatically.
- Configure NVR channels, storage, and access control. Assign each camera to a channel, set recording schedules (continuous, motion-triggered, or both), and configure how long footage is retained before overwriting. Set a strong admin password on the NVR.
- Enable remote viewing securely. Remote viewing requires port forwarding or VPN configuration on your business router. A VPN is the more secure option because it does not expose the NVR directly to the internet. Port forwarding is simpler but requires careful firewall rules to limit exposure.
Common mistakes to avoid during setup:
- Connecting cameras to the main business network before VLAN configuration is complete
- Using the same IP subnet for cameras and business devices
- Leaving default credentials on any device
- Skipping firmware updates before going live
- Overloading a PoE switch by connecting more cameras than its power budget supports
A thorough site walkthrough before installation helps confirm camera placements, cable routes, and lighting conditions before you pull a single cable. Fixing placement after installation is expensive.
What are the most common camera network problems and how do you fix them?
Most security camera problems come from network issues rather than camera hardware faults. Knowing where to look first saves significant time.
- PoE switch overload. If cameras drop offline randomly, check the PoE switch's power draw. Running a PoE switch at maximum capacity causes instability and random camera dropouts. The fix is either removing cameras from that switch or upgrading to a higher-wattage model.
- IP address conflicts. Two devices sharing the same IP address will both go offline intermittently. Use static IPs or DHCP reservations for every camera and NVR to prevent this.
- VLAN misconfiguration. If the NVR cannot see cameras after setup, verify that both are on the same VLAN and subnet. A single misconfigured switch port is enough to break discovery.
- Remote access failures. If you cannot reach the NVR remotely, confirm that your VPN or port forwarding rule is active and that the NVR's IP address has not changed. A DHCP reservation prevents the latter.
- Poor image quality or dropped frames. This usually points to insufficient network bandwidth or a camera set to a resolution higher than the network can support. Reduce resolution or upgrade the switch to a Gigabit model.
Pro Tip: Use your switch's management interface to check per-port power draw before adding new cameras. Most managed PoE switches display this in real time.
A clean, well-labeled network infrastructure with surveillance-grade hardware prevents the vast majority of camera system failures before they happen.
When problems persist after basic troubleshooting, calling a professional installer is the right call. Complex VLAN configurations and firewall rules are not forgiving of trial-and-error adjustments on a live business network. You can learn more about how business camera systems work to build a stronger foundation before calling for help.
Key Takeaways
Connecting security cameras to a business network requires dedicated VLAN segmentation, proper PoE hardware sizing, and strict firewall rules to protect both surveillance footage and corporate data.
| Point | Details |
|---|---|
| Use IP cameras with PoE switches | PoE delivers power and data over one cable, simplifying installation and reducing cost. |
| Isolate cameras on a dedicated VLAN | A separate VLAN prevents compromised cameras from reaching business systems or the internet. |
| Block outbound camera traffic | Firewall rules must deny cameras from initiating connections to the LAN or public internet. |
| Size PoE switches with power headroom | Running a switch at full capacity causes dropouts; budget at least 30% extra wattage. |
| Secure remote access via VPN | VPN is safer than port forwarding for remote NVR access and limits direct internet exposure. |
What I've learned from watching businesses skip the network planning step
After working with small and mid-sized businesses on camera installations, the pattern is consistent. Owners focus on camera count and placement, then treat the network as an afterthought. That order of operations creates real problems.
The most expensive mistakes I see are not hardware failures. They are network design failures. A business owner installs eight cameras on the main office network, skips VLAN setup, and six months later discovers that a camera with outdated firmware was the entry point for a network intrusion. The cameras were fine. The network design was not.
A site survey before installation is not optional. Lighting changes between morning and evening. Entry points look different at night. A camera that seems well-placed on a floor plan may deliver useless footage in practice. Walking the space at different times of day takes an hour and saves weeks of frustration.
My honest opinion on DIY versus professional installation: DIY works for simple setups with two or three cameras on a flat network. The moment you add VLANs, inter-VLAN routing, and firewall rules, the complexity justifies professional help. Professional installation offers compliance and longevity advantages that DIY rarely matches in commercial environments. The cost difference between doing it right the first time and fixing it later is not close.
Plan for growth from day one. Buy a PoE switch with open ports. Choose an NVR with more storage capacity than you currently need. Network infrastructure that cannot expand forces a full replacement when you add a second location or a new camera zone. That is a cost and a disruption that is entirely avoidable.
— Greg
Ventis Consulting Group can handle your camera network integration
Getting cameras on your network is one thing. Getting them on your network securely, with proper VLAN isolation, firewall rules, and remote access configured correctly, is another. Ventis Consulting Group works with small and mid-sized businesses in Pittsburgh and surrounding areas to design and deploy surveillance networks that protect both your premises and your IT infrastructure.

From managed IT services that cover ongoing network maintenance to hands-on camera integration and security hardening, Ventis Consulting Group brings the same consultative approach to every project. The team handles VLAN configuration, NVR setup, remote viewing, and firmware management so you do not have to. If you are ready to build a camera network that works reliably and stays secure, contact Ventis Consulting Group for a consultation.
FAQ
What is the best way to connect IP cameras to a business network?
Connect IP cameras to a managed PoE switch assigned to a dedicated camera VLAN, then place the NVR on the same VLAN. Use firewall rules to block cameras from reaching the main business network or the internet.
Do I need a VLAN for my security cameras?
VLAN isolation is required for businesses deploying 10 or more cameras and is best practice for any size deployment. A dedicated VLAN prevents a compromised camera from accessing corporate systems.
How do I enable remote viewing for my business cameras?
Remote viewing requires either a VPN or port forwarding configured on your business router. A VPN is the more secure option because it does not expose the NVR directly to the internet.
Why do my security cameras keep going offline?
The most common cause is a PoE switch running at or near its maximum power capacity. Check per-port power draw in your switch's management interface and remove load or upgrade the switch if it is near its limit.
How much does it cost to set up a business camera network?
A 4-camera professional installation typically costs $1,500 to $3,000, covering hardware, cabling, and configuration. Larger multi-camera systems cost more depending on the number of cameras and network complexity.